I was going to tell you about the Ugly Christmas Quilt today. And trust me, it's ugly! But I want to tell you about something else, instead.
I had taken more pictures, but I guess not all of them were uploaded for some reason, but I'll work with that I've got.
People have been commenting on my Facebook pictures of some of my embroidery that they think it's really pretty and that I'm talented. While I appreciate this, because (1) I think they're pretty, too and (2) I work really hard at getting better and better at my embroidery and it's gratifying to know that people notice (thanks bunches!!) I also think more people can get the results I'm getting. No, really!
I think the results I'm getting are totally doable by most amateur embroiderers because there really aren't any complicated stitches in the pieces people are commenting on. Lazy Daisies, French Knots, Buttonhole Stitch, Chain Stitch....I think that's it! Hop on over to Mary Corbett's Needle'NThread where she has tons of tutorials to show you all this stuff. I do have one trick of my own to share.
LAYERS
That, folks, is the key.

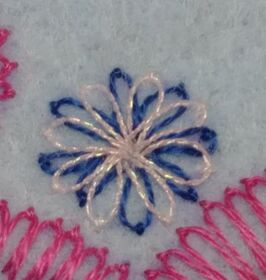
I took two pictures, one of just the blue lazy daisy flower and one after the Light Effects floss was added, but just the one survived. Oh well, you get the point. BTW, that's one strand of a regular DMC dark blue color (don't know the number) and one strand of DMC Light Effects E818, a kind of pinky color. It's really easy to get a nice even flower. I draw a circle on my felt (poly felt is what I am practicing on) with air soluble pen (work fast) and start at whatever I'm going to make the top of the circle and make a lazy daisy stitch from the center to the top. Then flip it 180 degrees and using the needle as a guide, I make another lazy daisy exactly opposite. Eyeball 90 degrees and make another to the left or right, whichever, then 180 it again and using the needle as a guide again, make a lazy daisy exactly opposite to that one. After that just eyeball making a lazy daisy in between the four perpendicular stitches already there. Voila! A nice, neat lazy daisy flower. Using the other petals as a guide, it is pretty easy to make the second layer in between those neat petals. Double Voila!

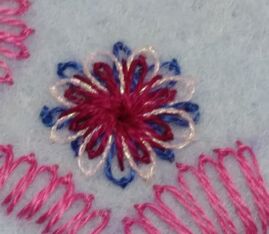
Here's the third layer. That's about where I stop with these things. Layers are great, but you can overdo on good things, too.
I put a lazy daisy inside the Light Effects and a straight stitch inside the blue lazy daisies. This works better on somewhat larger flowers. If you try it on something too small, the center gets too jumbled up and its a mess and it's hard to push the needle through near the end of that last go round.
You could try making the Light Effects the last round, but I really think it's nice peeking out from the middle. I tried it on the outside and didn't like it nearly as much. I've yet to try it as the first layer, that might be interesting.

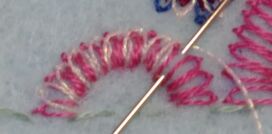
I really like these detached lazy daisy arcs, too. I don't start and end in the same place, so it's more like a reallllllllly long fly stitch, but I think this is close enough to a lazy daisy to call it that, don't you? I usually do two layers on those as well.
I don't always use the Light Effects as the second layer. A second layer of something that coordinates works well.
I don't always use the Light Effects as the second layer. A second layer of something that coordinates works well.
The only reason it seems like I'm obsessed with the Light Effects floss is that they are kind of new to me and I'm trying to check them out to see what they can do. They are a total pain in the rear end, however, so I don't know how much I'm really going to be using them. A bit of beeswax helps. But they still get horribly messed up by threading them and they are not soft and bendable like regular floss.
I did get a set of the whole Coloris line, and I'll be looking those over and blogging about that as well in the not to distant future.
In the meantime, Happy Stitching!
I did get a set of the whole Coloris line, and I'll be looking those over and blogging about that as well in the not to distant future.
In the meantime, Happy Stitching!
 RSS Feed