Trying Sourdough Again, and Having the Most Success So Far
My poor sourdough starter has languished in the fridge for quite some time now. I had been taking it out and feeding it once in a while, but I was reluctant to try again because I had questionable success in the past. I found a different website and video (I will give references at the end) and tried this person’s method. It turned out awesome this time!
I have to say, even though it was in the fridge for a long time, my starter was doing just fine. I have read a few articles and watched a few videos which say that established starter can be stored in the fridge for a long time without feeding. Some articles say it’s not true. Whatever is going on, my starter seems to be doing just fine with living in the fridge in between baking. But I decided it was time for my starter to have a chance at making a great loaf of sourdough again, so I divided off a small portion of the starter to keep living in the fridge and the rest I brought out to bulk up for baking.
I have to say, even though it was in the fridge for a long time, my starter was doing just fine. I have read a few articles and watched a few videos which say that established starter can be stored in the fridge for a long time without feeding. Some articles say it’s not true. Whatever is going on, my starter seems to be doing just fine with living in the fridge in between baking. But I decided it was time for my starter to have a chance at making a great loaf of sourdough again, so I divided off a small portion of the starter to keep living in the fridge and the rest I brought out to bulk up for baking.
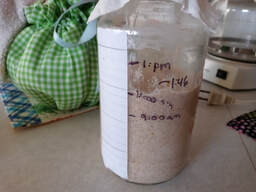 CHECKING ON THE RATE OF RISE
 Now, when I say “bulked up” that’s my own term for feeding the starter with flour without necessarily pouring off any slop. I might or might not. Mostly not, because I want to make sure I’ve got enough for baking. I start this process at least a few days before I want to bake the loaf. In this case, I wanted to bake the loaf on Friday morning, so I started bulking up my starter on Tuesday, checking in and feeding it at least a couple times per day and stirring it to aerate it quite often.
The day before you bake, feed it at least two times, the last feeding giving your starter enough time to come to peak activity before you start to shape and rise. In my starter’s case, that’s about 4 hours. I’m going to do a quick 30-minute initial rise, so add that time in too. So that means I had to feed my starter about 4 ½ hours before the initial rise, I think that was about 4:00 pm or 5:00 pm, I can’t remember exactly what time. It depends on how long you want to stay up or if you have to go to bed early. Adjust for your schedule.
The day before you bake, feed it at least two times, the last feeding giving your starter enough time to come to peak activity before you start to shape and rise. In my starter’s case, that’s about 4 hours. I’m going to do a quick 30-minute initial rise, so add that time in too. So that means I had to feed my starter about 4 ½ hours before the initial rise, I think that was about 4:00 pm or 5:00 pm, I can’t remember exactly what time. It depends on how long you want to stay up or if you have to go to bed early. Adjust for your schedule.
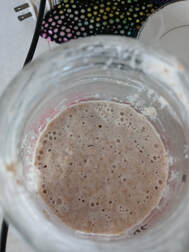 NICE AND ACTIVE
 When the starter is most active, mix your ingredients (starter, warm water, flour, and salt, I will give you the link to the recipe I used at the end of this blog) and make a shaggy dough. Cover and let rise for 30 minutes. After this, stretch and fold, adjust flour if needed (It is awfully humid where I live so I did wind up adding more flour even though I’ve heard not to add more). Cover and let rise overnight. I just put mine on the kitchen counter, no fancy cold pack setup or anything. It was fairly warm in the house although the outside temps were getting into the 30s and 40s (Fahrenheit) but the kitchen didn’t dip below 65 degrees I’m sure.
Now, the baking!
The next morning, fold the dough a few times to form a ball, getting good tension in your loaf. Put it in your banneton with any kind of “seam” side up (the less pretty side). I don’t have an official banneton, so I use a Dollar Tree colander with a floured bread towel (I make special towels that I only use for bread and rolls type purposes). Works just fine for me. Cover and let it rise for 2-3 hours.
In the last 30 minutes or so (depending on how long it takes your oven to come to temp) preheat your oven, along with your Dutch Oven. I can’t recommend any other way to bake sourdough, but if you don’t have one there are other options. I think they go into that in the recipe/video I’m going to reference. But the Dutch Oven is the best.
Get some parchment ready to cradle your loaf to lower it into the hot Dutch Oven and to be able to lift it out again. Make sure you tear off enough parchment for this purpose. Pull your oven tray out a bit and take off the cover of the Dutch Oven. Sprinkle some cornmeal on the bottom of the Dutch Oven. Tip out your loaf onto the parchment, slash with a sharp knife or a razor, and lower it into the Dutch Oven. Spritz with a bit of water and put the cover back on the Dutch Oven. Slide it back in and bake 20 minutes with the cover on and 30 minutes with the cover off.
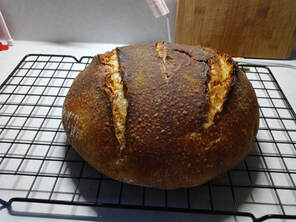 THE SLASHING ACTUALLY WORKED THIS TIME
 THE MOST IMPORTANT PART: Let cool completely before slicing. I never used to wait, and I think that was part of my bread failures, although I didn’t realize it at the time. This might mean waiting 6 hours (or maybe more!). Just let that loaf get to room temperature on a cooling rack, one that gives it as much room for the air to circulate even around the bottom as possible. Restaurants don’t freshly bake your bread; they bake it early and reheat it when they serve it to you. I waited about 4 hours for my loaf. It was well worth it, although it was really hard.
At last, the reward! How to serve your glorious loaf? Being so nice and crusty, these kinds of loaves are great served with soup for dipping, especially French Onion. I found out also that my bread was GREAT for French Toast. On another night, I soaked a couple pieces in the juices of the steak I had broiled and then toasted the slices in a cast iron pan on the stove. That was really good. Of course, being homemade bread with no preservatives your loaf does have a limited shelf life. I stored mine in a container with a lid that didn’t really seal all that well with a piece of paper toweling to soak up some humidity. The loaf should last quite a few days, but really mine got eaten before it was in danger of going bad. If you’ve got some left over at a point when you feel like it might be getting past its prime, cube it up, toss it with olive oil and spices, and bake in the oven for AWESOME croutons. You can freeze these for months and use a few when you need them. But you probably won’t have enough bread for that unless you bake a loaf specifically for that purpose.
I have to say, this time the process of making sourdough bread was much more enjoyable for me. I was less stressed about the whole thing, I didn’t have any expectations about how it was going to turn out, I had dispensed with all those “bakers’ ratios” or whatever you call them, I almost kind of flew by the seat of my pants, so to speak. And everything turned out wonderful. Good luck in your baking, you can do it, too!
Ciao until next time!
References:
- Great easy recipe with embedded video (be sure to watch the video, they have to rescue a newborn calf and it is cute) https://www.theprairiehomestead.com/2020/04/sourdough-bread-recipe.html
- Something I just found on how to score your loaf: https://sourdoughbreadsupportgroup.com/sourdough-bread-scoring/?v=7516fd43adaa
 RSS Feed